

How to Integrate a Chatbot Into Your eCommerce Website
Integrating a chatbot into your eCommerce website isn’t just a “nice-to-have” anymore, it’s the upgrade your store needs to convert faster, support smarter, and sell around the clock.
Today’s shoppers expect instant answers, personalized recommendations, and effortless navigation, and a well-integrated chatbot delivers all three without breaking a sweat.
If you’re looking to reduce cart abandonment, boost customer satisfaction, or automate repetitive support tasks, adding a chatbot to your online store is one of the easiest ways to transform your customer experience and your bottom line.
What is an eCommerce Chatbot?
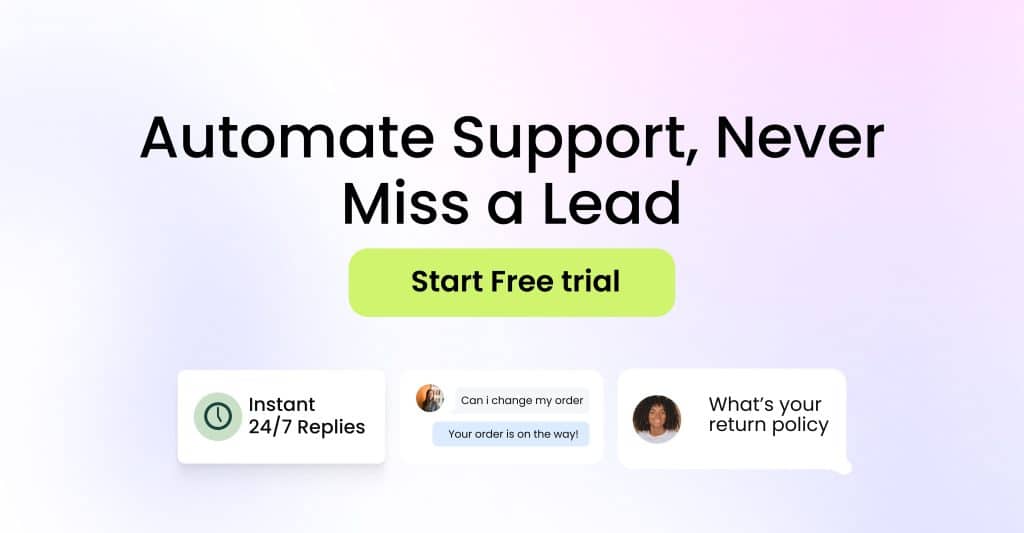
An eCommerce chatbot is an AI-powered virtual assistant embedded into an online store to help customers shop faster and smarter. It can answer questions, recommend products, track orders, guide users through checkout, and automate customer support, all in real time.
Why Your Business Needs an eCommerce Chatbot
- Higher Conversion Rates
Chatbots guide shoppers to the right products, answer objections instantly, and keep users engaged leading to more completed purchases. - Lower Customer Support Costs
Instead of hiring large support teams, a chatbot can automate up to 70–80% of repetitive inquiries, saving time and operational costs. - 24/7 Sales & Support
Your store keeps running even when your team isn’t. Chatbots ensure customers get assistance anytime, increasing trust and satisfaction. - Reduced Cart Abandonment
Bots send reminders, answer last-minute questions, and help users complete their checkout, recovering sales you would’ve lost. - Personalized Shopping at Scale
Chatbots offer tailored recommendations and product suggestions based on each shopper’s behavior something humans can’t do for thousands of customers at once. - Better Customer Experience
Quick support, smooth navigation, and immediate guidance make shoppers happier and more likely to return. - Data-Driven Insights
Chatbots collect valuable data about customer needs, pain points, and buying patterns, helping you make smarter marketing and product decisions.
Why You Should Use the SalesGroup AI Chatbot for Your eCommerce Website
SalesGroup AI gives your online store the support power of a full customer service team, without the cost, delays, or human limitations. It transforms how your customers shop, interact, and get help, making every step faster, smoother, and more satisfying.
1. Instant 24/7 Replies
Shoppers don’t wait, and with SalesGroup AI, they don’t have to. The chatbot answers product questions, return policies, order status, and more instantly, any hour of the day. This keeps customers engaged and dramatically lowers drop-offs.
2. AI-to-Human Handoff for Complex Issues
Not every conversation can be automated, and SalesGroup AI handles this perfectly. It switches from bot to a human agent when needed, ensuring customers always get accurate help without frustration.
3. Faster Response Times = More Conversions
With an average response time of 3 seconds, SalesGroup AI eliminates the waiting time that kills sales. Faster answers mean fewer abandoned carts and higher customer satisfaction.
4. Proven Boost in Customer Satisfaction
SalesGroup AI users enjoy a 95% customer satisfaction rate, thanks to quick support, helpful replies, and seamless interactions. Happy customers buy more and return more often.
5. Automated Order Tracking & Return Assistance
The chatbot can instantly send tracking updates, explain return policies, and guide users through post-purchase steps—reducing support workload while delivering a world-class customer experience.
6. Escalation When Needed
If a customer needs human help, the chatbot escalates the conversation effortlessly. No dead ends, no frustration—just smooth, intelligent support.
7. Designed for eCommerce Growth
SalesGroup AI isn’t just a chatbot; it’s a revenue engine. It keeps users engaged, answers objections instantly, and helps shoppers complete purchases confidently.
How to Integrate a Chatbot Into Your eCommerce Website
1. Create or Log In to Your SalesGroup AI Account
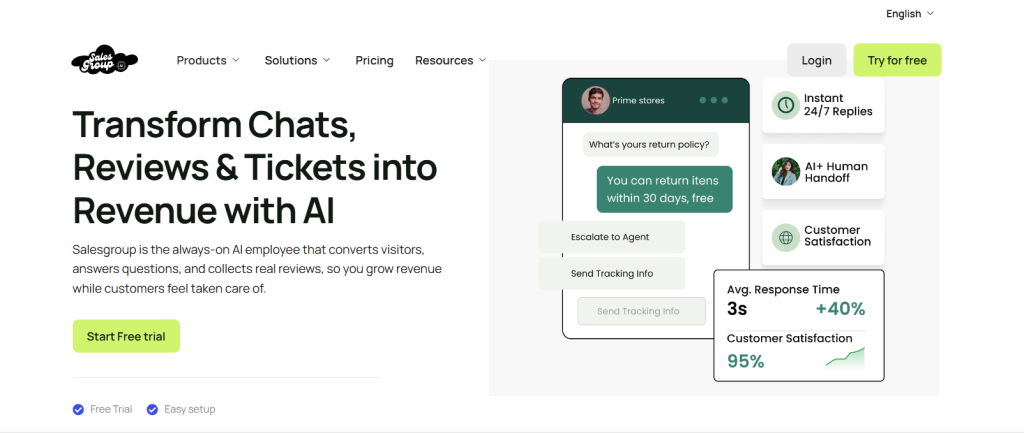
The first step to integrating a chatbot into your eCommerce website is becoming a registered SalesGroup AI user.
- If you already have an account, simply go to the SalesGroup AI website and tap Login to access your dashboard.
- If you’re new, tap Try for Free to create your account. The signup process is quick and gives you instant access to the chatbot builder and integration tools.
Once you’re in, you can begin customizing your chatbot and connecting it to your store.
2. Create Your Chatbot from the Dashboard
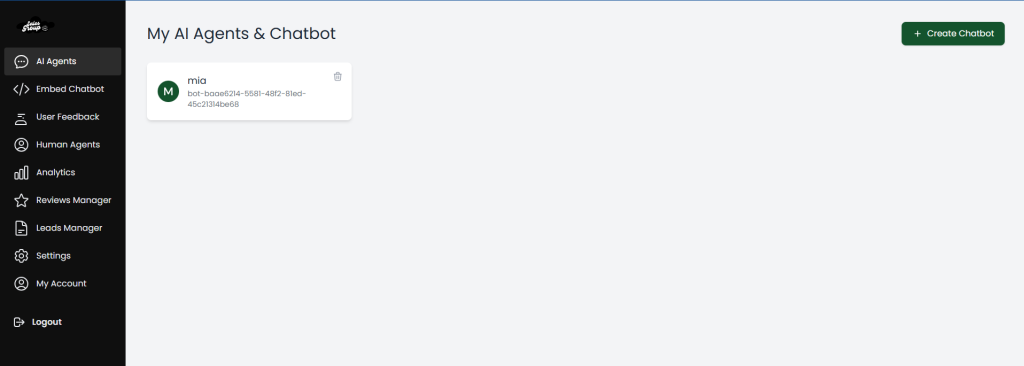
After signing in, you’ll be taken to your SalesGroup AI dashboard. On the top-right corner, you’ll find the “Create Chatbot” button. Tap on it to start building your chatbot.
This opens the setup page where you can name your chatbot, choose its role, and begin customizing its behavior to match your store’s needs.
3. Name Your Chatbot

Once you click Create Chatbot, a pop-up widget will appear asking you to name your chatbot. This is where you give your chatbot its identity, something that matches your brand’s voice and the role it will play in your store.
If you’re unsure what to name it, don’t worry. We’ve created a helpful guide to inspire you. Check out our article on chatbot names to explore creative and brand-friendly options.
4. Add Content to Your Chatbot’s Knowledge Base
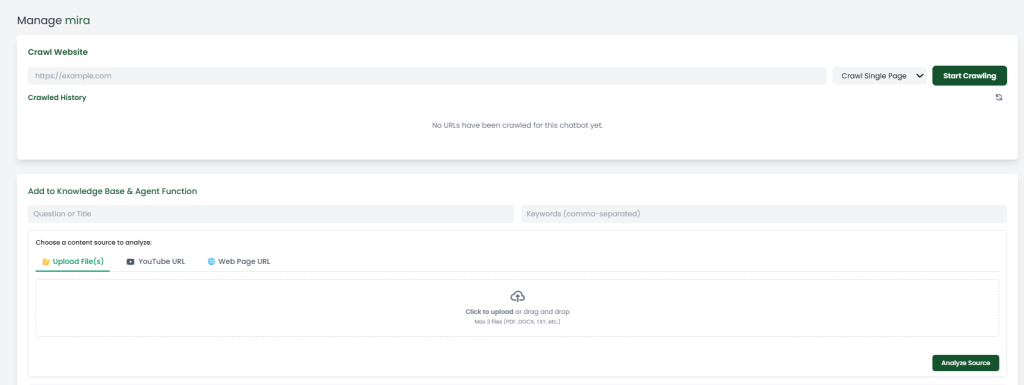
After naming your chatbot, you’ll be redirected to the management page where you can feed it the information it needs to respond accurately.
On this page, you can add content in three ways:
- Crawl your website:
Enter your website URL in the Crawl Website field, select whether you want to crawl a single page or the entire site, then tap Start Crawling. This allows the chatbot to learn directly from your existing content. - Upload files:
Upload PDFs, DOCX, TXT files, and more. This is ideal for product catalogs, FAQs, policies, or documentation. - Add links (YouTube or webpage URL):
Paste a YouTube link or a webpage URL, and the system will analyze the content and add it to your knowledge base.
You can mix multiple content sources to build a strong, well-informed chatbot.
When you’re done, tap Analyze Source to process the information and update your chatbot’s knowledge.
5. Customize Your Chatbot’s Responses, Appearance, and Behavior
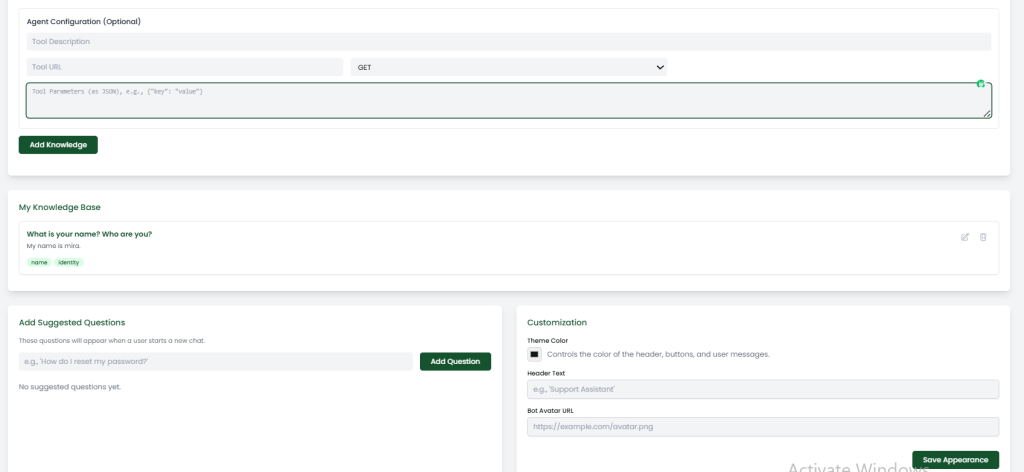
After adding knowledge sources, the next step is to customize how your chatbot behaves and how it looks on your website.
• Add Agent Functions (Optional)
If you want your chatbot to perform actions—like fetching data from an external tool or API—you can configure it here.
Enter the Tool Description, Tool URL, and any Tool Parameters (JSON), then tap Add Knowledge.
This step is optional but powerful for advanced automation.
• Review Your Knowledge Base
Below this section, you’ll see everything your chatbot has learned so far.
You can edit or delete entries anytime to keep your bot’s knowledge accurate.
• Add Suggested Questions
These are quick-access prompts that appear when a customer starts a chat.
Examples include:
- “Where is my order?”
- “What’s your return policy?”
- “Do you ship internationally?”
Simply type a question and click Add Question to include it.
• Customize Appearance
On the right side, you can personalize how your chatbot looks to match your brand:
- Choose your theme color
- Add a custom header text (e.g., “Support Assistant” or your store name)
- Upload or link a bot avatar
Once done, tap Save Appearance.
This ensures your chatbot feels like a natural part of your eCommerce store.
6. Configure Your Mira AI Settings
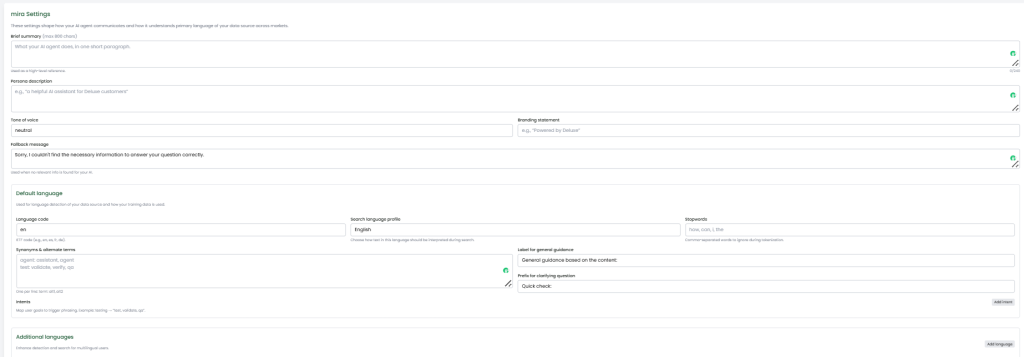
This step defines how your chatbot communicates, understands questions, and represents your brand.
Inside this section, you’ll fill out the key details that shape your AI assistant’s personality and behavior.
• Brief Summary
Enter a short description of what your AI agent does.
Example:
“An intelligent support assistant that helps users navigate your site, answer questions, and access information quickly based on your knowledge base.”
• Persona Description
Describe the personality of your chatbot.
Example:
“A friendly, helpful, and knowledgeable assistant that responds clearly and professionally.”
• Branding Statement
Add a simple brand-aligned line that reinforces identity.
Example:
“Powered by your trusted support team.”
• Tone of Voice
Choose the tone you want your chatbot to use.
Most brands select Neutral, Professional, or Friendly.
• Fallback Message
This message appears when the chatbot doesn’t have sufficient information to answer.
Example:
“Sorry, I couldn’t find the information you need. Please try rephrasing your question.”
Default Language Setup
• Language Code
Select the main language your bot will communicate in.
Example: en for English.
• Search Language Profile
Choose how the bot should interpret search queries.
Example: English.
• Synonyms & Alternate Terms
Add variations of common terms so your bot understands users even when they phrase things differently.
Examples:
agent: assistant, bot
order: purchase, item
shipping: delivery
test: validate, verify
• Prefix for Clarifying Questions
This prefix appears when the bot needs to ask a follow-up question.
Example:
“Quick check:”
Optional: Add Intents
Intents help the bot identify user goals (e.g., “track my order,” “refund,” “pricing”).
You can add custom intents for things like:
- Order tracking
- Returns & refunds
- Shipping information
- Product questions
- Account support
After completing these fields, click Save to apply your Mira settings.
This step ensures your chatbot communicates clearly, aligns with your brand voice, and understands your customers effectively.
7. Embed Your Chatbot on Your Website
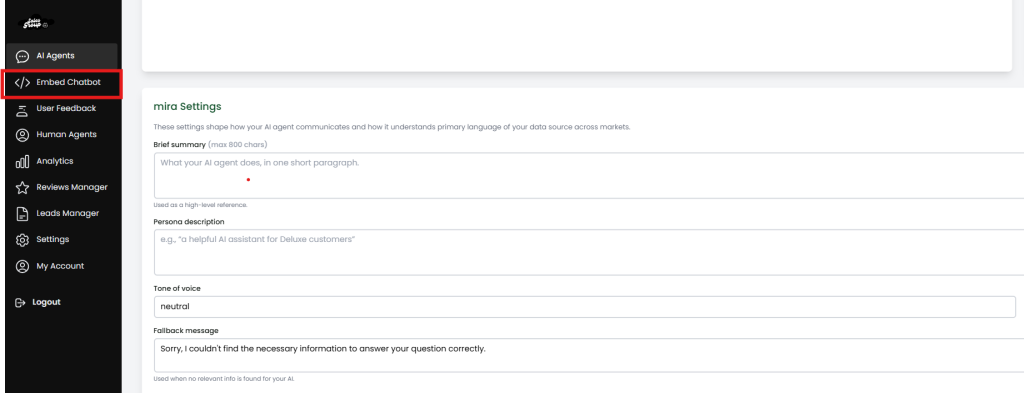
After configuring your chatbot’s Settings, the next step is to make the chatbot visible and functional on your website.
This is done through the Embed Chatbot section shown in the left sidebar.
This step provides you with the script code required to install your chatbot on any website platform.
• Locate the Embed Script
On the left menu, click “Embed Chatbot.”
This opens a page containing your unique embed code — a small JavaScript snippet your website needs to load the chatbot widget.
The code typically looks like:
<script src="https://yourchatbotwidget.js" async></script>
(Your actual script will be shown in the platform.)
• Copy the Embed Code
Click the Copy button to copy the script to your clipboard.
This code is what connects your website to your AI agent.
• Paste the Code Into Your Website
Paste the script inside your website’s HTML, usually right before the closing </body> tag.
Here’s where to paste it based on your platform:
For Custom HTML Websites
- Open your site’s main HTML file
- Paste the code before
</body> - Save and publish changes
For WordPress
- Go to Appearance → Theme File Editor
- Open footer.php
- Paste the code above
</body>
OR
Use a plugin like Insert Headers and Footers
For Shopify
- Go to Online Store → Themes → Edit Code
- Open theme.liquid
- Paste code before
</body>
For Wix
- Go to Settings → Custom Code
- Click Add Code
- Paste the script and apply site-wide
• Save and Refresh
Once the code is added to your website theme, save changes and refresh your site.
You should now see the chatbot widget — usually at the bottom-right corner of your page.
• Test Your Chatbot
After embedding:
- Open your website
- Click the chatbot widget
- Ask a few questions
- Confirm it responds correctly
This ensures everything is working before customers start using it.
Conclusion
Integrating a chatbot into your eCommerce store isn’t just a technical upgrade, it’s a powerful growth move.
With SalesGroup AI, you’re not only automating support; you’re creating a faster, smoother, and more personalized shopping experience that keeps customers coming back.
The entire setup takes minutes, and the impact lasts for the life of your business. If you’re ready to boost conversions, reduce support stress, and deliver 24/7 customer satisfaction, start building your SalesGroup AI chatbot today and transform the way your store connects with customers.
